

Scanning Your Family Photos for Archiving
This tutorial is to offer some tips I've learned along the way and lay out guidelines for your own digital archiving projects. I'll try not to get too technical but this tutorial does assume you have some experience with scanners and so will skip some steps.
Equipment
Today many inkjet printers come combined with scanners and these will do an adequate job scanning photos - but not slides and negatives. When it comes to slides and negatives, one has to look at flatbed scanners which have a special adapter designed for this very task. There are several brands on the market and they only really differ in the software that comes with them. Since I own an Epson V200 some of the examples I give will be specific to that model but in general should work with any model chosen.
Settings
Before we touch the scanner let’s take a look at the monitor. Monitors have a setting called “color temperature” accessible through a menu by way of the buttons on the front. Out of the box your monitor typically will be set to a cool 9300K (warm is considered 3200K) which will give whites a slightly blue tint. This should be set to 6500K or "warm" whichever is an option to produce the proper medium shade of white.1
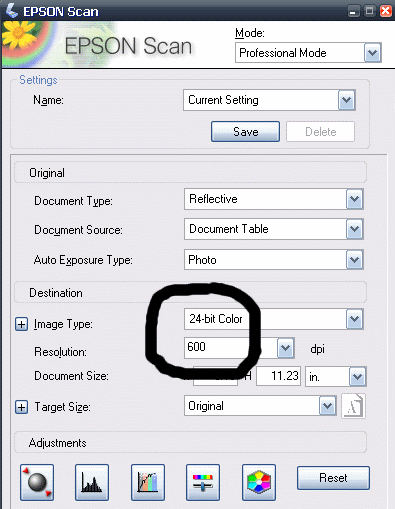 With the Epson scanner, the software has three modes from basic to professional. I use the professional mode because it offers the extra settings necessary to make the most of my scans. When given the option, always choose to scan a slide (also called a positive) or a negative in favor of a print. The reason for this is that a slide/negative holds so much more information than a print. The “nice bright colors and greens of summer” of Paul Simon's Kodachrome slides are the equivalent of about a 20+ Megapixel image. In other words, today's digital cameras are just now matching the detail contained in a 60 year-old slide. Photos, however, are reproduced on paper just like a poster or an art print. Because of this they are only printed at 300-600 dots per inch (dpi) which means much of the detail that was in the negative doesn’t transfers to the paper. When scanning photos, set the resolution to 300 or, preferably, 600 dpi. For slides/negatives set it to 2400 or, my preference, 3200 dpi.
The next setting to look at is the bit setting. For b&w images set the scanner software to scan in 8-bit grayscale. What this means is that the image will have 28 (or 256) values of gray from black to white. For color images pick 8-bit RGB/24-bit color. Some software will offer 16-bit RGB/48-bit but setting it that high will create an unnecessarily large file and most graphics programs can't work with 16 bit image files.

Now that you've put your source image (picture/negative/slide) on the scanner and hit the "preview" button, what's next?
The first step is to set the margins of the scan. This accomplishes two things: one, so that you don't scan more than you need and two, you can more accurately set the color balance with the histogram tool. Try to trim the edges as close as possible to the image area but if you have a white border then leave some, but not too much, at the edge for setting the "White Point". When the margins are set hit the "Scan" button.
With the Epson scanner, the software has three modes from basic to professional. I use the professional mode because it offers the extra settings necessary to make the most of my scans. When given the option, always choose to scan a slide (also called a positive) or a negative in favor of a print. The reason for this is that a slide/negative holds so much more information than a print. The “nice bright colors and greens of summer” of Paul Simon's Kodachrome slides are the equivalent of about a 20+ Megapixel image. In other words, today's digital cameras are just now matching the detail contained in a 60 year-old slide. Photos, however, are reproduced on paper just like a poster or an art print. Because of this they are only printed at 300-600 dots per inch (dpi) which means much of the detail that was in the negative doesn’t transfers to the paper. When scanning photos, set the resolution to 300 or, preferably, 600 dpi. For slides/negatives set it to 2400 or, my preference, 3200 dpi.
The next setting to look at is the bit setting. For b&w images set the scanner software to scan in 8-bit grayscale. What this means is that the image will have 28 (or 256) values of gray from black to white. For color images pick 8-bit RGB/24-bit color. Some software will offer 16-bit RGB/48-bit but setting it that high will create an unnecessarily large file and most graphics programs can't work with 16 bit image files.
Now that you've put your source image (picture/negative/slide) on the scanner and hit the "preview" button, what's next?
The first step is to set the margins of the scan. This accomplishes two things: one, so that you don't scan more than you need and two, you can more accurately set the color balance with the histogram tool. Try to trim the edges as close as possible to the image area but if you have a white border then leave some, but not too much, at the edge for setting the "White Point". When the margins are set hit the "Scan" button.
Tools
Once you have the preview scan on your screen, it's time to delve into the toolbox.
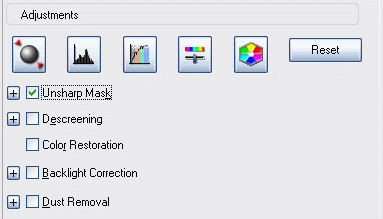 The first thing to do is set the "Unsharp Mask". This oddly named setting actually sharpens edges and is a good idea but not mandatory to use. Second is "Color Restoration". This setting is incredibly useful if you are working with slides and photos that have color-shifted over time and quite often will work miracles with those old, now-magenta photos. Next is finding a "White Point".

Use this tool to pick a spot that should be the whitest white in your source image and watch it work its magic. You can use this in place of, or in conjunction with, the "Color Restoration" tool to get the colors just right. With the Epson software it is located on the Histogram page.
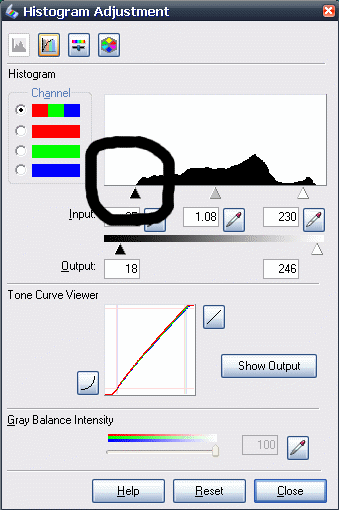 Finally, your most useful and valuable tool is the histogram (in the “Tools” illustration it's the button that looks like a mountain). Just like the "White Point" tool, you can use this with the “Color Restoration” tool. It is probably your most versatile tool and should not be overlooked. Quite honestly, it should be the last tool you use before you hit the "Scan" button.
Without getting too technical, the histogram shows how much of a color exists in the picture. For b&w images, this is a range of gray from black (0) to white (255). For color, this is Red/Green/Blue from none to highly saturated. This is where if you allow too much margin in your scan area then it will affect the high end value.
To use this tool, move the black and white arrows to the end points - don't worry about the gray arrow in the middle. What this does is it tells the scanner that since there are no shades below 36 (in this example) to set this as 0 and since there are no shades above 240 to set this as 255. The effect is that instead of 204 (255-36-15) shades of gray (or red/green/blue), you now have a range of 255. The end result being more shades of gray giving you more detail. Conversely, if you move the arrows inward, you will increase the contrast at the expense of detail. Think of it as getting more black and white and less of the gray in between. Sometimes this will enhance a color image but I prefer to do that later in the editing software. There are, of course, exceptions to the above so play around with an image and see what looks good.
Try "Dust Removal" if you think you need it but be careful that it doesn't work too well and introduce artifacts into the image. Also be aware that it doesn't work with b&w negatives or with Kodachrome slides because of their chemical makeup.2
The first thing to do is set the "Unsharp Mask". This oddly named setting actually sharpens edges and is a good idea but not mandatory to use. Second is "Color Restoration". This setting is incredibly useful if you are working with slides and photos that have color-shifted over time and quite often will work miracles with those old, now-magenta photos. Next is finding a "White Point".
Use this tool to pick a spot that should be the whitest white in your source image and watch it work its magic. You can use this in place of, or in conjunction with, the "Color Restoration" tool to get the colors just right. With the Epson software it is located on the Histogram page.
Finally, your most useful and valuable tool is the histogram (in the “Tools” illustration it's the button that looks like a mountain). Just like the "White Point" tool, you can use this with the “Color Restoration” tool. It is probably your most versatile tool and should not be overlooked. Quite honestly, it should be the last tool you use before you hit the "Scan" button.
Without getting too technical, the histogram shows how much of a color exists in the picture. For b&w images, this is a range of gray from black (0) to white (255). For color, this is Red/Green/Blue from none to highly saturated. This is where if you allow too much margin in your scan area then it will affect the high end value.
To use this tool, move the black and white arrows to the end points - don't worry about the gray arrow in the middle. What this does is it tells the scanner that since there are no shades below 36 (in this example) to set this as 0 and since there are no shades above 240 to set this as 255. The effect is that instead of 204 (255-36-15) shades of gray (or red/green/blue), you now have a range of 255. The end result being more shades of gray giving you more detail. Conversely, if you move the arrows inward, you will increase the contrast at the expense of detail. Think of it as getting more black and white and less of the gray in between. Sometimes this will enhance a color image but I prefer to do that later in the editing software. There are, of course, exceptions to the above so play around with an image and see what looks good.
Try "Dust Removal" if you think you need it but be careful that it doesn't work too well and introduce artifacts into the image. Also be aware that it doesn't work with b&w negatives or with Kodachrome slides because of their chemical makeup.2
Saving your scan
You should never ever save your scans as jpegs (jpg). Let me repeat that. You should NEVER EVER save your scans as jpegs. Ideally you would use Tagged Image Format (tif/tiff) but you can use bitmap (bmp) format also. The reason for not using jpegs is that much like photo prints, jpegs lose detail. Jpgs and mp3 music files are what is known as "lossy". This means that to make the file size smaller they lose some of the information that was in the original. Save as a tiff file so that you don't lose anything; you can always convert a copy to jpg later when emailing or sharing. The downside is larger file sizes but well worth it in detail retained. Don't try to touch up the photo at this stage. You are trying to get the best possible scan of the original image here. If you decide to touch up the photo, do it afterward and make sure to save it separate from the original with a different file name. This way you will always have the original, untouched image to go back to if need be.
I recommend using a simple, standard naming format such as B1-001 for box 1 photo 1 and keep a spreadsheet or text/Word document to make notes about who is in the photo and the where and when. Additionally, you can include the details in the summary field of the photo with Windows Explorer.3 Once you have enough files, burn them to CD/DVD, save them to an external hard drive, or both.
Some final notes
•Scan sepia tinted photos as grayscale. The negatives were originally silver. Sepia is a printing process and sometimes this effect is merely from the paper tanning with age.
•Kodachromes are beautiful, vibrant, and saturated with color … but most scanners have a problem with them. They scan with a slightly blue cast that requires software like Silverfast to correct easily.
•If you don't quite like how your b&w negatives come out, try scanning them as positives and reverse/invert the colors with your editing software.
Doing the job right takes some time and a bit more effort than just hitting a button but is well worth it in the end when you have the best possible scan and there is no need to go back later and do it again.
Guidelines
•Scan photos at 300-600dpi
•Scan slides/negatives at 2400-3200 dpi
•Scan tintypes (if you are lucky enough to have some) at 1200 dpi
•Use the histogram to get the widest range of colors/grays
•Save as Tif/Tiff files
•Document the source – was it scanned from the original photo (or negative) or a copy of a photo
•Put it in a spreadsheet detailing what you know about the pictures (i.e., the who, what, where, when, and why)
If you want to read more about these and other tools, the website Scantips.com is an excellent resource.
Footnotes
1 Because things heat up from red-hot to white-hot to blue-hot, the scale goes from a warm reddish 3000 Kelvin (4900°F) to a cool blueish 9000+K. So a cooler temperature is described as “warm”.
2 B&W and Kodachrome film use silver crystals to form an image. Ektachrome and Fujichrome films use a dye system like typical C-41 color film. Dust removal tools have trouble with these crystals and sometimes see them as dust.
3 Right click on the image and select “Properties” then click on the “Summary” tab.


Panther Computers Homepage Version 5
© 1998-2018 PantherSoftware